
Introduction
Quick Navigation
As you become more experienced in diving, you start adding new tools to your gear. Your level of experience requires you to try out different things to have a better diving experience ultimately. One of the many things you will need along the linE is a Surface Marker Buoy (SMB).
The sole purpose of this equipment is for your safety – just like the others in your gear. Therefore, you cannot afford to get just anything – the best buoys available would guarantee better performance. In this article, you will understand an SMB and how to deploy it effectively for good diving.
What is a Surface Marker Buoy (SMB)?
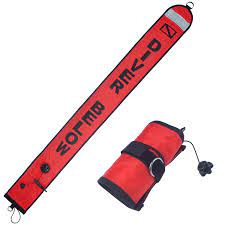
Surface Marker Buoy (SMB) is an emergency signaling device designed for divers exploring open waters. It is an inflatable safety tube that marks a diver’s location and prevents many marine life injuries. It is also called a Delayed SMB.
In the past years, diving claimed the lives of many divers and caused serious boat accidents. However, with safety scuba skills and an SMB recently introduced, there is an active way to call for help before anything happens. All a diver has to do with this device is shoot it up, and quick response actions are taken.
SMBs are usually brightly colored – sometimes, they are coated with reflective materials for good visibility. Irrespective of how a delayed SMB is designed, it signals to dive boats that there is an emergency underwater.
How to Deploy a Surface Marker Buoy: Step-By-Step Guide
Having an SMB is not enough; you need to learn how to deploy it successfully. Below is a step-by-step guide on how to properly deploy a surface buoy.
Step 1: Get Prepared
Getting all that you need ready before deploying your SMB is a significant thing to do. You should check your surface marker buoy and other equipment in your gear properly and make sure they are in great condition. It would also be best if you signal early, so that dive boats can have enough time to be well-adjusted. This preparation is only aimed at safety.
Step 2: Mark Your Area
The one rule of SMBs is to make sure there are no other nearby divers or marine life that will tangle with the line you are about to make. Therefore, marking your area and checking if there are no obstructions is another important thing to do. Peradventure there are other divers; you should endeavor to maintain a safe distance from them.
Step 3: Pre-Dive Weight Check
A Pre-dive weight check is one of the many things you need to do before diving at all. This pre-dive procedure is important to help you maintain neutral buoyancy for a safer and comfortable experience. It involves making sure you are packed with the right weight to keep your head above water and the legs underneath.
Check out how to complete a Pre-dive weight check here.
Step 4: Keep the SMB Ready
As long as you maintain neutral buoyancy, you are ready for the next phase of the SMB deployment. First, ensure that the spool in the SMB is properly attached so that it doesn’t lose its grip. It is identified with a D-ring attachment to the loop.
Next, ensure that you aren’t hooked to the SMB so that you won’t be pulled away by the line’s force. Again, it is a protocol for safety.
Step 5: Inflate Your Scuba Gear
While you are doing the above, you never can tell what has happened in such a short time. For instance, you could have an impromptu obstruction, and that could affect what you’re doing. Therefore, you must recheck your surroundings and make sure you are within a safe distance.
If you are clear, the next step is inflating your scuba gear. There are different ways to inflate an SMB, and it always depends on the type. However, a simple way of doing that is keeping the spool, line, extra SMB material together on hand and inflating the SMB on another.
Another simple method is using a secondary inflator hose. Manual inflation methods are also good but maybe not that effective.
Step 6: Release the SMB
Now that you have a well-inflated SMB, what you need to do is release it. Releasing this SMB doesn’t mean you have to let go of all the parts – save the reel. If you hold onto other parts apart from the reel, there is a good chance that the inflated SMB’s force will pull you and affect your buoyancy.
The main essence of not holding onto other weights is to maintain a stable, neutral buoyancy. Now, do not leave your position until you can finally see the SMB at the surface.
Step 7: Dive to the Surface
Once you can see the SMB at the surface, your business underwater is over; it is now time to ascend. In a unidirectional way, dive towards the surface carefully. Ensure to keep the SMB straight up at the surface while you ascend to avoid being tangled up. If you find a taut line, it would be helpful.
Step 8: Wait for a Response to Your Signal
Now that you are at the surface, you shouldn’t fold the SMB away. Instead, it would be best if you remained at that position until there is a response to your signal, i.e., a dive boat reaching you.
Keep the SMB floating upright by pulling down with the reel and leaving out some of the line.
Step 9: Get SMB Stored Properly
If a dive boat or another diver reaches you, do not get yourself comfortable for a moment before storing the SMB. Fold all these parts correctly even before getting on the boat.
Conclusion
Even if you are an amateur, knowing how to deploy a surface marker buoy is important. It is a safety protocol to protect divers from marine life accidents. Following the above steps sure helps a lot; however, you must be very careful to avoid getting entangled.